Checkmate is the ultimate goal of the game of chess, and is the main way to win. But how exactly do you know if you’re in checkmate or just check? And how do you find opportunities to checkmate your opponent?
This guide will take you through everything you need to know!
- What is checkmate?
- How do you know if a check is also a checkmate?
- How do you find checkmates?
- How do you spot checkmates in the middle of the game?
- How do you checkmate in the endgame?
What is checkmate?
Checkmate is when your king is in check—meaning that your king is attacked by an enemy piece—and cannot legally escape. Because kings may never be captured, players must move their king out of check on the very next move. If this is not possible, then the result is checkmate.
Once checkmate is reached, the game ends immediately, and the player who delivered the checkmate is declared the winner.
Checkmate is often casually referred to as just “mate,” so don’t be confused if you also see this term!
In algebraic notation, checkmate is recorded with a # symbol. So checkmating your opponent by moving your queen to g7 would be notated as Qg7#.
How do you know whether it’s checkmate or just check?
If you’re wondering if a position is checkmate, use these three simple steps (order doesn’t matter!) to determine if a check is also checkmate:
- Look for any legal squares for the king to move out of check.
- See if the piece that’s putting the king in check can be captured.
- Look for another piece that can move to block the check.
If none of these three steps work, then it’s checkmate and the game has ended.
How do you find checkmates?
Firstly, checkmate is always a check! So consider all possible checks, and see if your opponent will have any ways to escape or not.
Secondly, look for ways that your pieces can work together. One way to do this is by forming batteries, which are two or more long-range pieces on the same rank, file, or diagonal. Together, your pieces are much stronger, because one piece defends the other, which allows you to add attacking power.
Once you have a battery lined up, look for ways to attack along that rank, file, or diagonal. Many checkmates happen when you use a battery to strike!
Avoid just sending one lonely piece into battle by itself, since this likely won’t be enough to deliver checkmate.
Next, look for weak points around your opponent’s king. Pawns that are only defended by the enemy king are often great targets to attack, and may be potential spots for a checkmate.
Finally, watch your opponent’s back rank (the furthest rank on the board from your perspective), and look for chances to move a rook or queen to this rank, which is often weak or undefended.
How do you spot checkmates in the middle of a game?
If you find it difficult to spot checkmates when there are lots of pieces still on the board, don’t panic! Fortunately, many checkmates rely on common motifs, and practicing the same mating patterns can help you spot them faster in your next game.
Here are some common types of checkmates that you should be on the lookout for:
Back rank mate
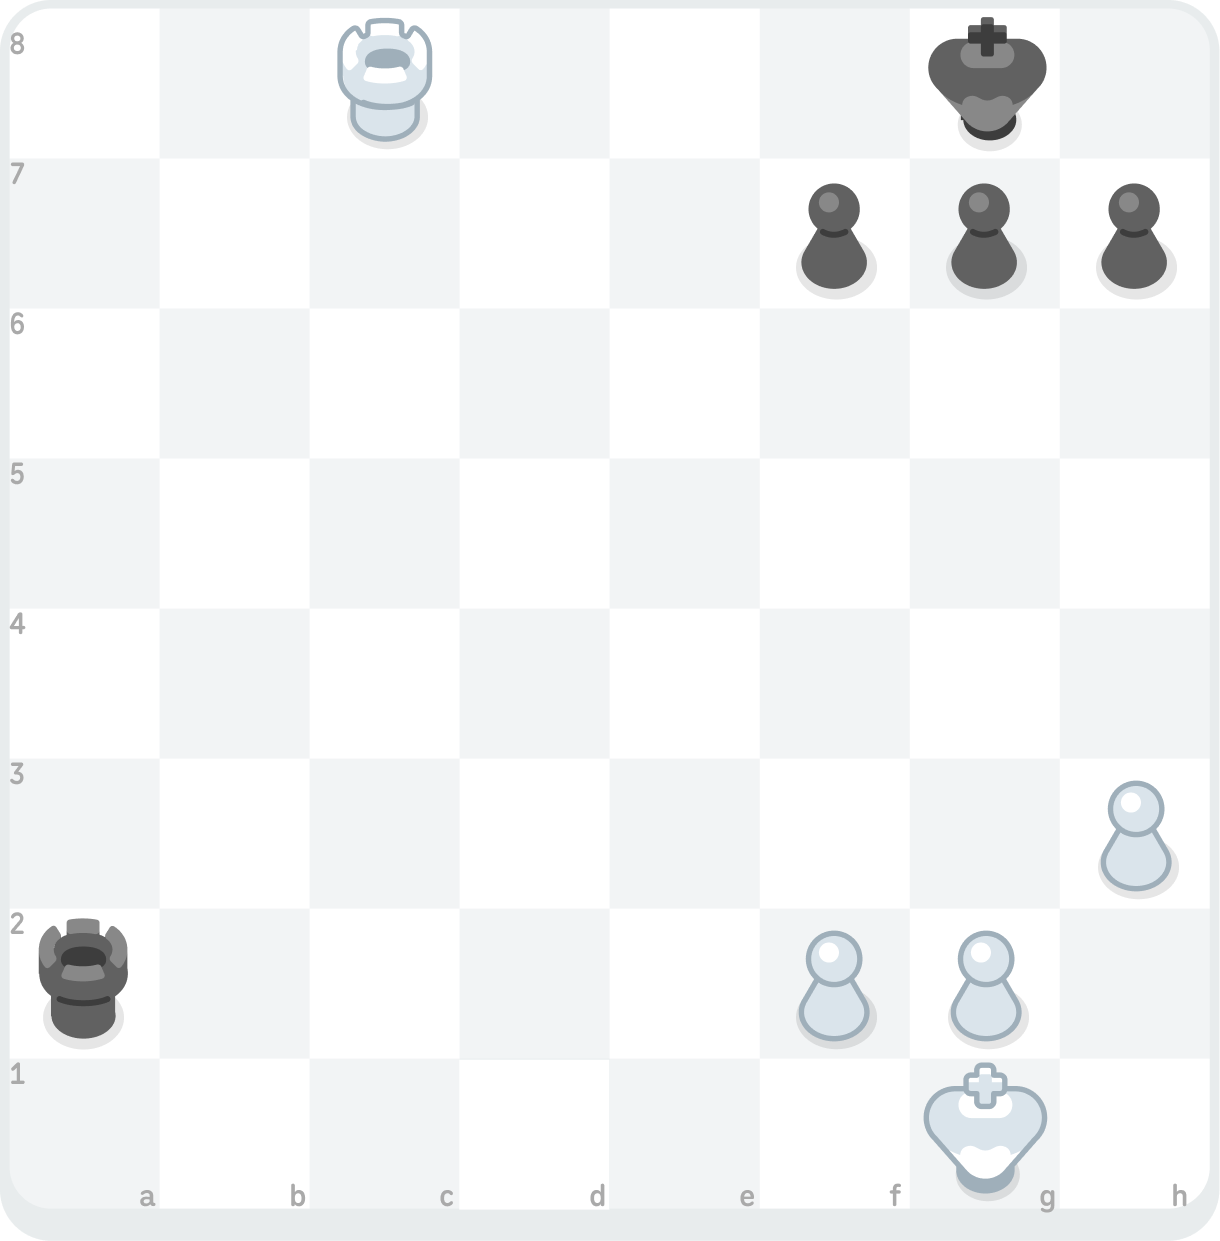
A back rank mate is when you move a queen or rook to your opponent’s back rank, checkmating them. The back rank—the furthermost rank from each player’s perspective—is often weak because there are often no pieces left after all the pieces have already been developed. Because the second from the back rank is where the pawns start out, these same pawns form a wall on the second rank, preventing their own king from escaping!
Smothered mate
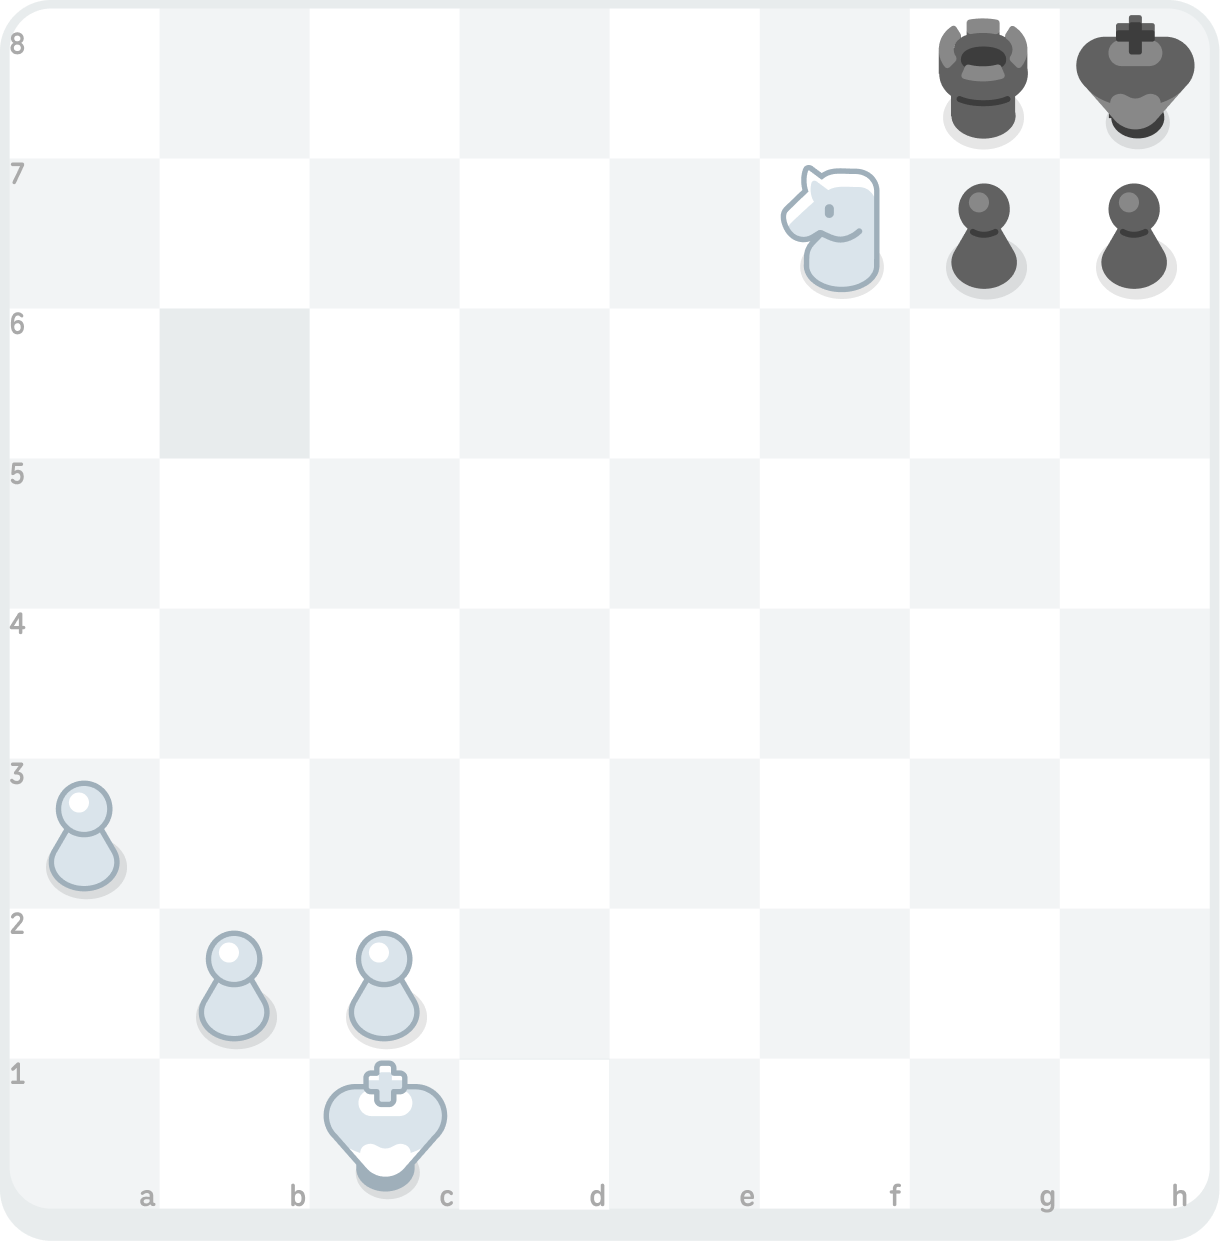
A smothered mate is when a knight checkmates an enemy king that is almost entirely surrounded by its own pieces. This checkmate often starts with a forced sequence where a piece (often a queen) is sacrificed to attract an enemy piece to the square right next to the opponent’s king, which will be used to trap the king!
Damiano’s mate
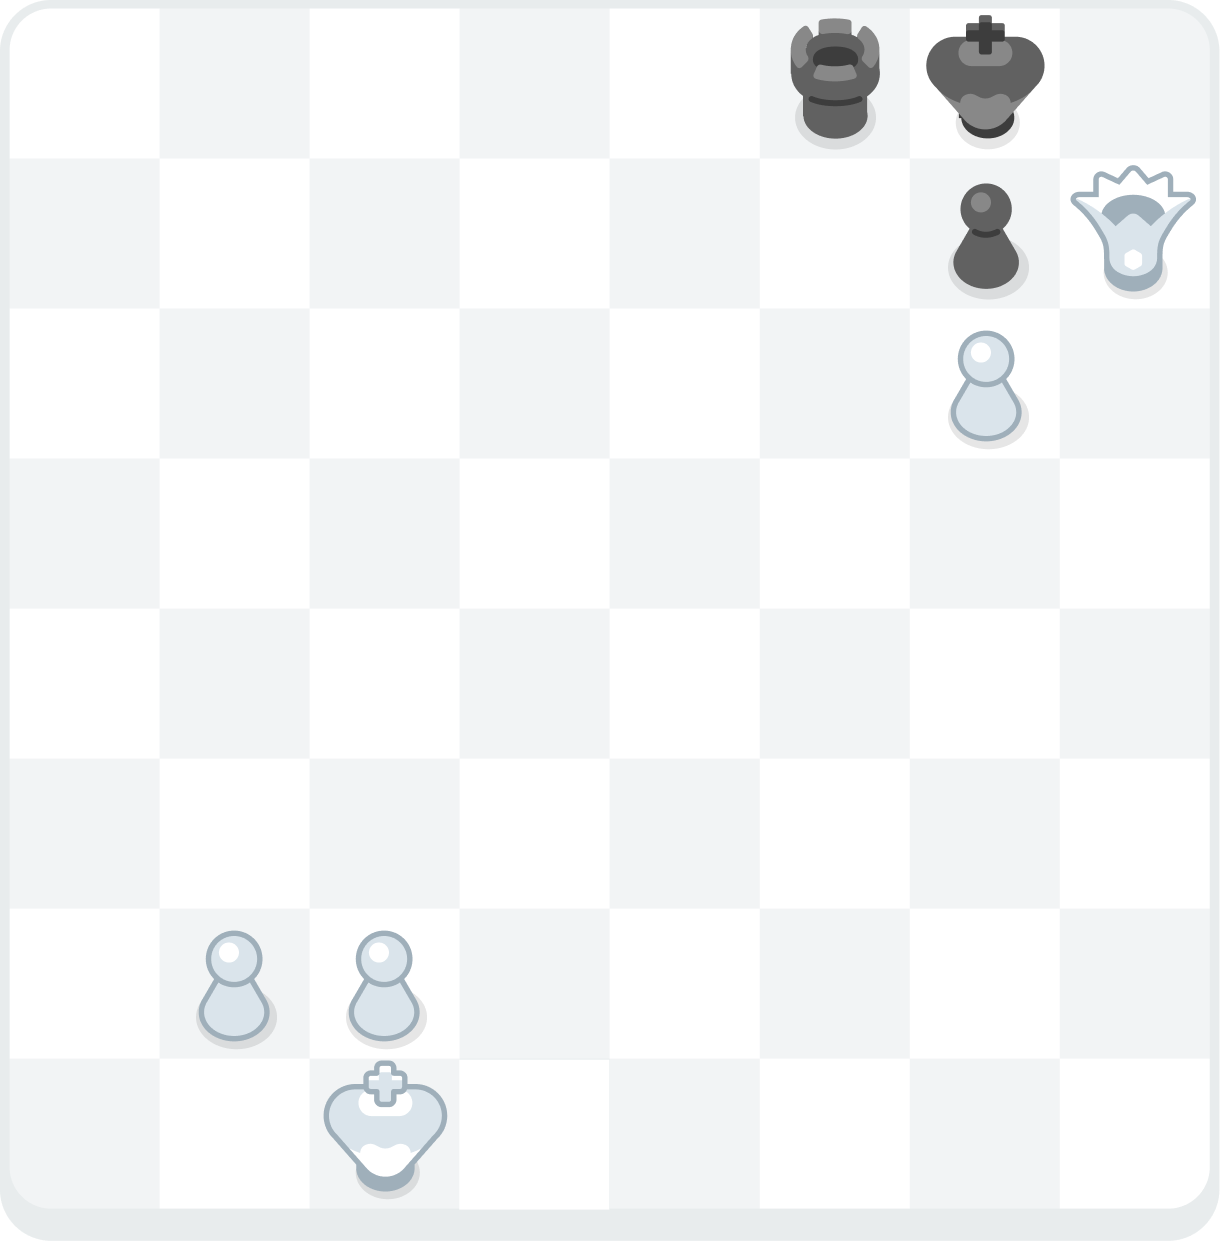
Damiano’s mate is when a queen delivers checkmate, defended by a pawn or bishop, which also cuts off another potential escape square for the enemy king. It’s also common to see a sacrifice of a rook just before executing this checkmate!
Arabian mate
The Arabian mate is a pattern where a rook (or a queen) and a knight work in tandem to checkmate the opponent. The knight defends the rook, and simultaneously cuts off another escape square for the enemy king, while the rook delivers checkmate.
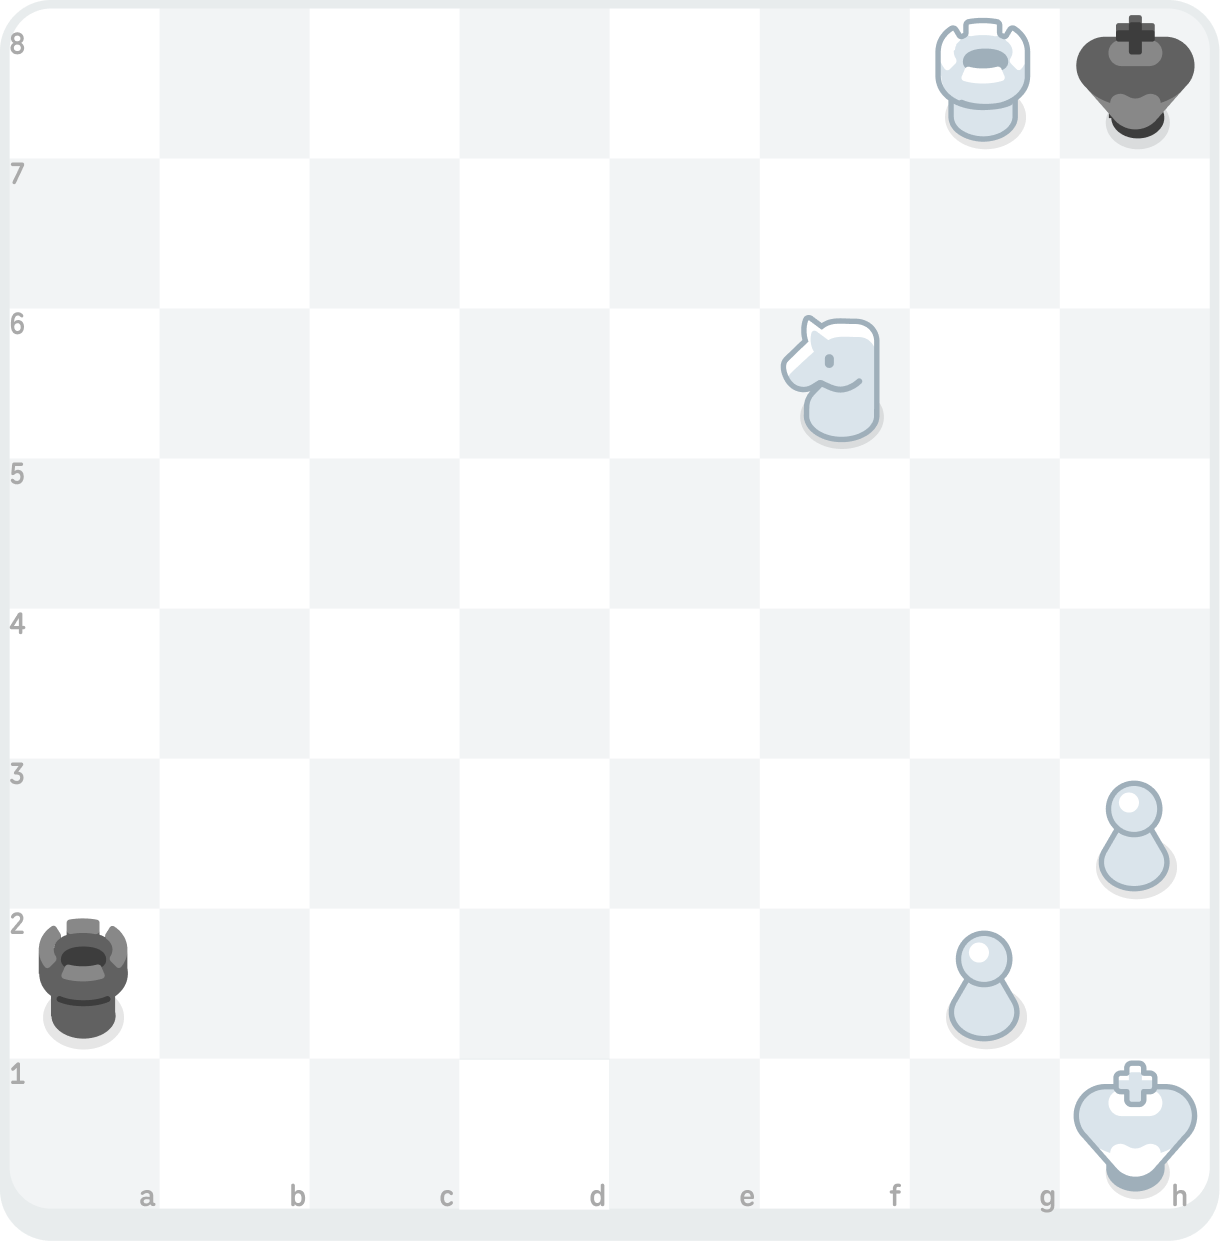
While learning the names of checkmating patterns is not necessary, learning these thematic motifs is very useful. They will help you spot complicated checkmates that you otherwise might miss. They also help you see piece coordination and how the pieces move and attack squares. These same skills will also help you spot tactics and attacks!
How do you checkmate in the endgame?
In the endgame, when one side has only one or two major pieces left, checkmating requires knowledge of specific patterns. For instance, checkmating with a lone queen, a lone rook, or two rooks (or a queen and a rook) are all very important basic endgame checkmating patterns to learn.
Checkmating with a king and queen
Despite the queen being the most powerful piece on the board, this checkmate is often one of the trickiest for beginners to execute, since it’s easy to accidentally stalemate your opponent. However, it’s extremely common, since many endgames result in a pawn promotion, creating a new queen that you then use to checkmate.
To complete this checkmate, you want to first use your queen to restrict the enemy king. One way to do this is to always move your queen a knight’s move’s distance away from the king, getting closer—but still a knight’s move away—each time the enemy king moves back.
Once the king is pushed to the edge of the board near but not yet in the corner, with one extra square to move to, bring in your own king until it is two ranks away from the enemy king to defend your queen as it delivers the final blow.
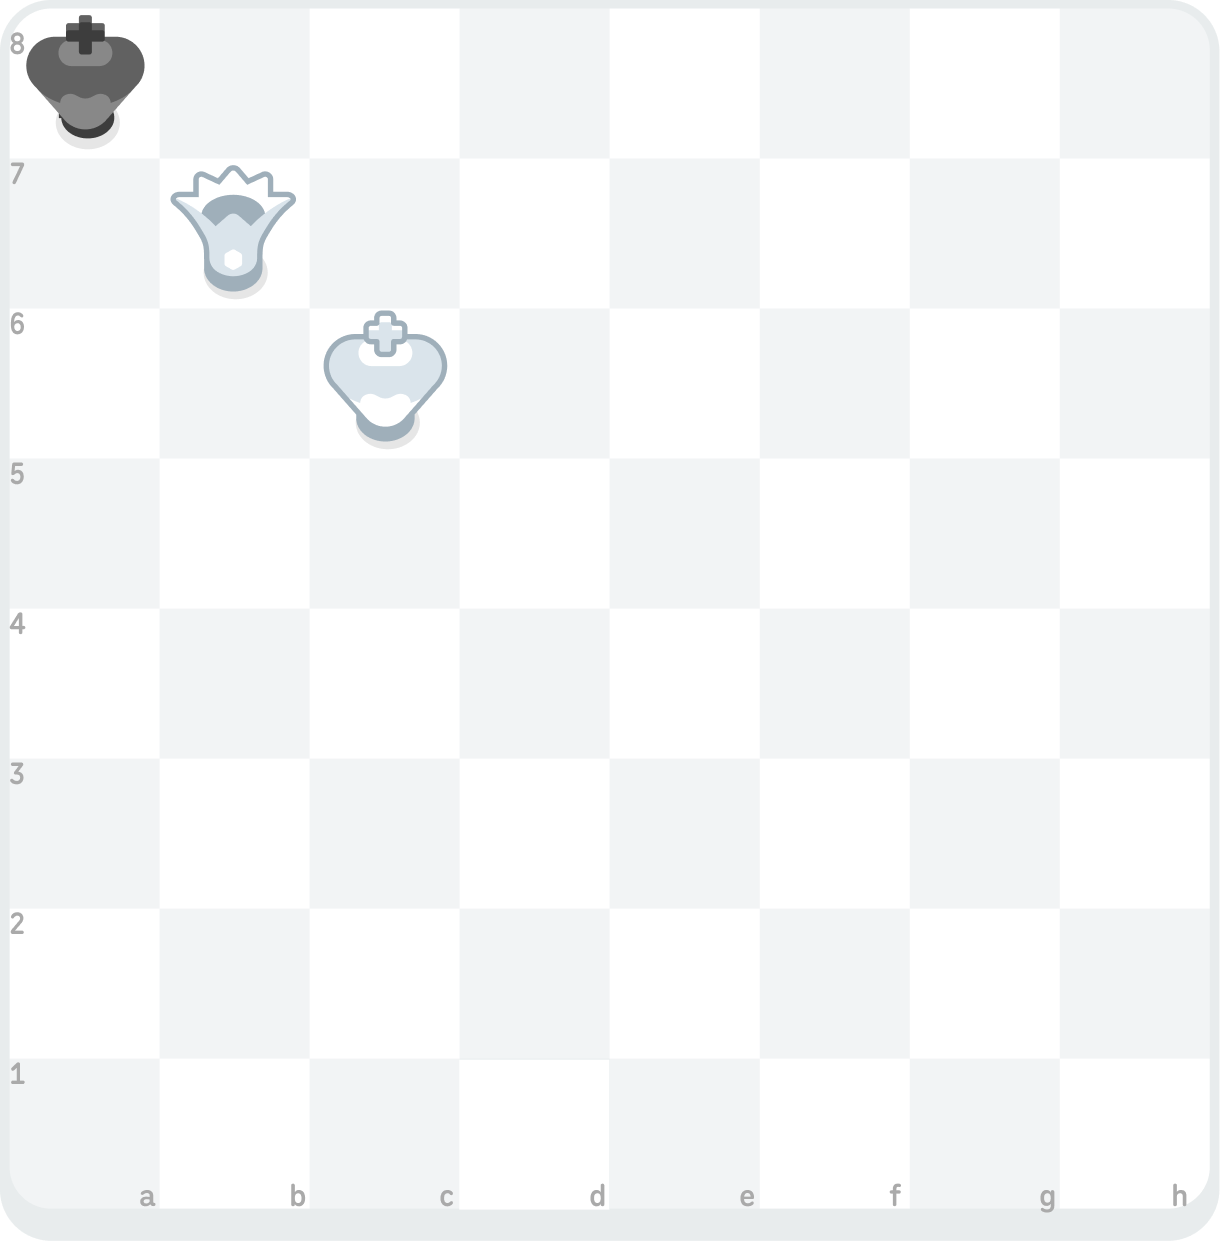
Make sure that you always leave the enemy king one extra square of pacing room to avoid stalemate. Many beginners accidentally push the king to the very corner of the board with their queen, forgetting to allow an extra square for the king to move back and forth to. If this happens, the enemy king will have no possible square to move to, and the game will end in stalemate, which is a draw for both sides, not a win for you!
Checkmating with a king and rook
Checkmating with one lone rook also requires some finesse.
First, you want to use your king and rook to push the enemy king to the very edge of the board. One way to do this is to use your own king to directly face the enemy king with just one square in between (this king placement is called opposition), then use your rook to check the enemy king. This will then push back your opponent’s king. Repeat until their king is on the very edge of the board.
Once this happens, you want to make sure your rook is on the neighboring rank or file, then use your king to cut off any remaining escape squares. Finally, deliver checkmate on the edge of the board with your rook.
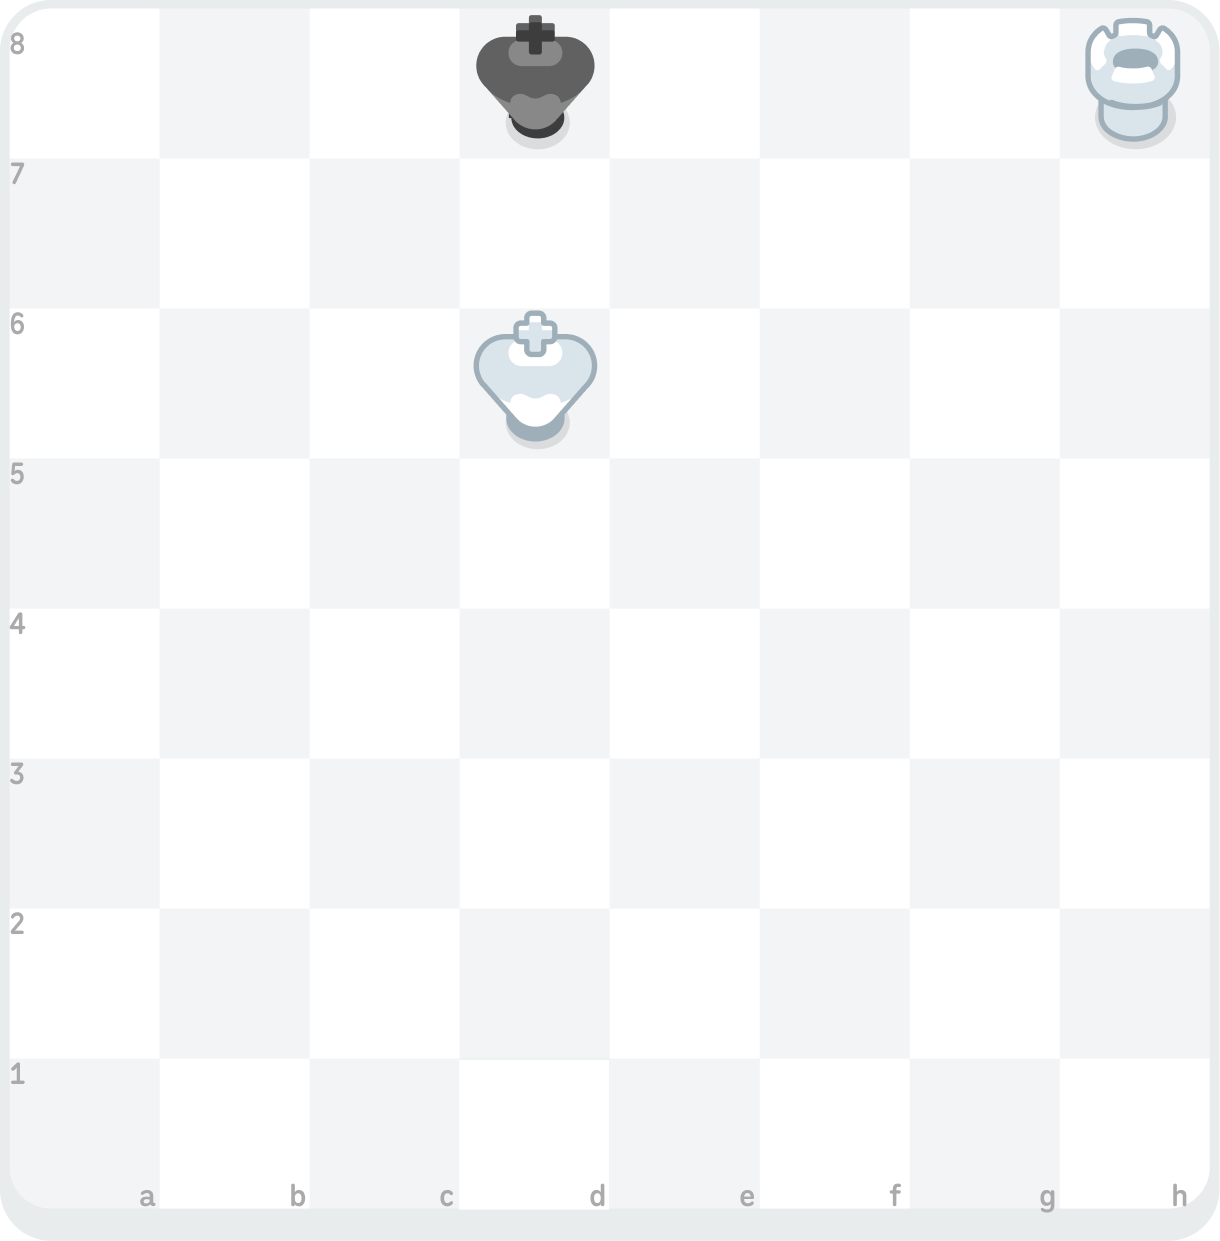
Make sure that you always keep your rook out of reach of the enemy king, so it can’t be captured!
Checkmating with a king and two rooks (or a queen and rook)
This checkmate is often known as the Ladder Mate or Lawnmower Mate, because you use each rook (or queen and rook) to alternately move up the board, pushing the king further back each time until it is checkmated. Like the checkmate with just one rook, remember to move your rooks to the opposite side of the board if the enemy king gets close enough to attack your pieces!
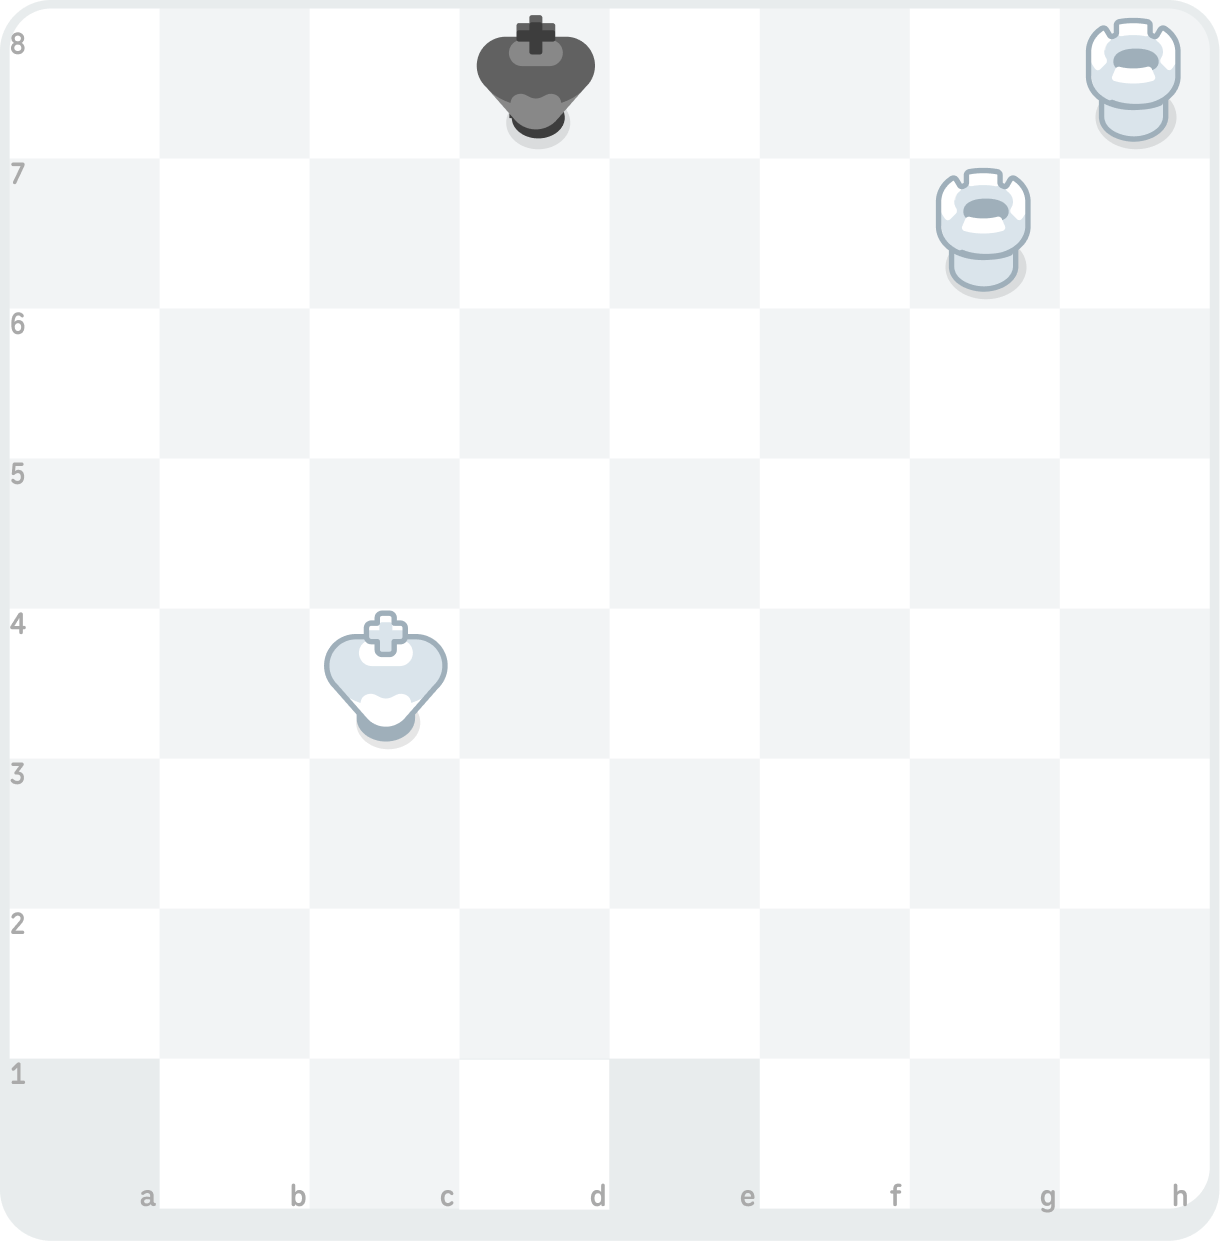
If you’re not experienced, these basic checkmates are much trickier to execute than they may initially sound, so put in the time and practice them over and over until you can reliably carry them out!
Checkmate, please!
Checkmate is the main objective in the game of chess. At the end of the game, it doesn’t matter how many pieces each side had, or who was closer to promoting a pawn—only the player who successfully delivers checkmate is the victor! Practice looking for checkmates in your own games, as well as drilling checkmate puzzles to improve your ability to detect checkmates. Start slow, and go from there!